Flash 2 Quiz 2


You may modify the design of this site to make it your own subject matter choice.(optional)


Step 1.

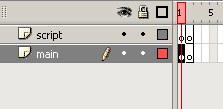
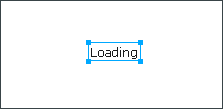
Start off by making a new Flash document with dimensions of 700 width by 500 height. Name the first layer "main" and the second layer "script". Then create 2 blank key frames (f7) on each layer. First of all we're going to create a preloader, which will make sure the whole of the flash website is loaded before the user sees it. It also indicates to the user that something is happening, rather than them seeing a blank canvas, while it loads. So, on the 1st frame of the "main" layer create add the text "loading", using these settings.

http://www.flash-game-design.com/assets/Basic-flash-site/3b.gif

http://www.flash-game-design.com/images/spacer.gif

a )


b)

http://www.flash-game-design.com/assets/Basic-flash-site/2.gif

http://www.flash-game-design.com/images/spacer.gif

http://www.flash-game-design.com/assets/Basic-flash-site/3.gif


Step 2.

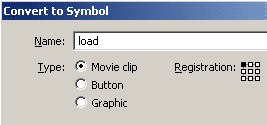
Make sure the text is selected and convert it into a Movie Clip Symbol (Modify > Convert to Symbol or F8) called "load".

http://www.flash-game-design.com/images/spacer.gif

http://www.flash-game-design.com/assets/Basic-flash-site/4.gif


Step 3.

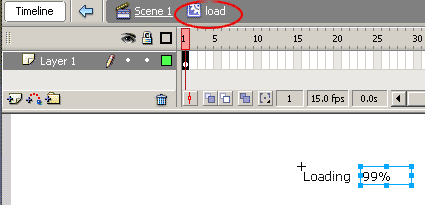
Now that the text is in it's own Movie Clip, double click on it and create the text "99%" using these settings. You'll notice that instead of choosing static, as with the "loading" text, the text has been made dynamic. This allows the text to be changed with actionscript, while the user is on the website. The letter "p" has also been added in the field "Var". This gives the text a variable (p) which will store the information that we want to be displayed in the text box. As the website loads "p" will hold the current percentage that the site has loaded to.

http://www.flash-game-design.com/assets/Basic-flash-site/5b.gif

http://www.flash-game-design.com/images/spacer.gif

http://www.flash-game-design.com/assets/Basic-flash-site/5.gif


Step 4.

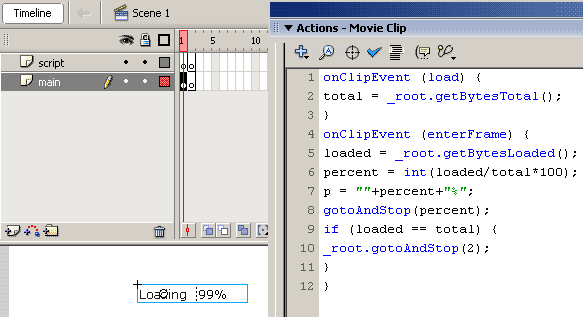
Next, go back to the main timeline and select the "load" Movie Clip that we just create, and add the code shown below. This code checks to see how much of the flash file has loaded and displays the percentage in the text. Once the whole of it is loaded, the timeline will go to frame 2, where we are going to create the website Movie Clips.

http://www.flash-game-design.com/images/spacer.gif

http://www.flash-game-design.com/assets/Basic-flash-site/6.gif


Step 5.

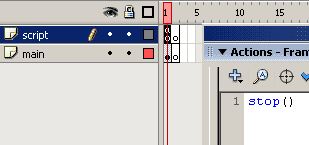
Before we do that, a stop() action is needed on the first frame, so that the site can load. This will prevent it from going to frame 2, where the site will be.

http://www.flash-game-design.com/images/spacer.gif

http://www.flash-game-design.com/assets/Basic-flash-site/7.gif


Step 6.

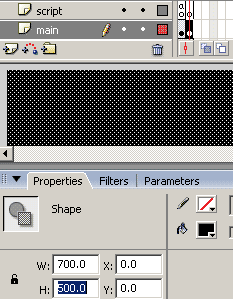
Now we shall start making the actual website :) On frame 2 create black rectangle with no border. While it is selected, in the properties panel change it's width to 700 and it's height to 500. Make it's X & Y position 0, making the black rectangle cover the whole of the canvas.

http://www.flash-game-design.com/images/spacer.gif

http://www.flash-game-design.com/assets/Basic-flash-site/9.gif


Step 7.

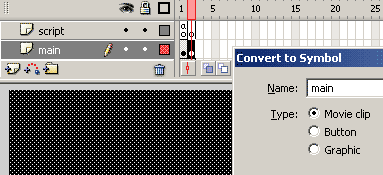
Convert the black rectangle into a Movie Clip symbol called "main". "Main" will contain all the websites assets (Movie Clips, Buttons and Text)

http://www.flash-game-design.com/images/spacer.gif

http://www.flash-game-design.com/assets/Basic-flash-site/11.gif


Step 8.

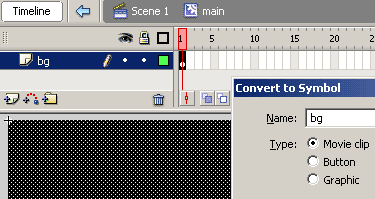
Double click on the Movie Clip symbol and name the layer "bg" (background). Convert the rectangle into another Movie Clip symbol, also called "bg". This Movie Clip will contain, as you've probably guessed, the background, which are all the parts of the website that will not change

http://www.flash-game-design.com/images/spacer.gif

http://www.flash-game-design.com/assets/Basic-flash-site/13.gif


Step 9.

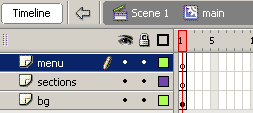
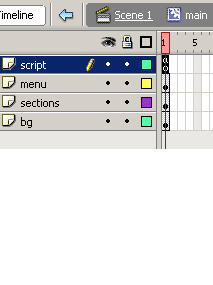
Create to extra layers, one called "menu" and one called "sections".

http://www.flash-game-design.com/images/spacer.gif

http://www.flash-game-design.com/assets/Basic-flash-site/14.gif


Step 10.

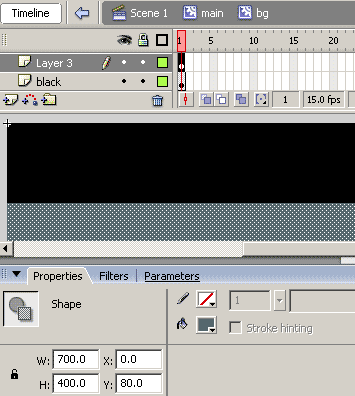
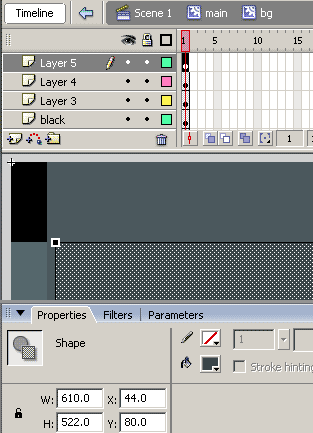
Next, double click on the "bg" Movie Clip and create another rectangle on a new layer above. Use the color #55676D and the settings shown in the image below. You can see the published version of how it looks by clicking on the image below.

http://www.flash-game-design.com/images/spacer.gif

Click to Enlarge

http://www.flash-game-design.com/assets/Basic-flash-site/16.gif


Step 11.

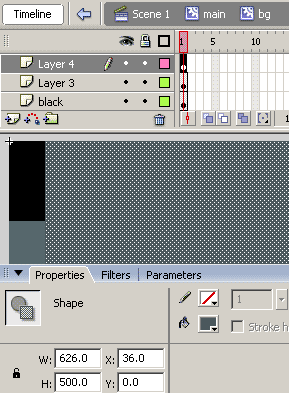
Create another rectangle on a new layer above, using the color #4B585D and the settings shown below.

http://www.flash-game-design.com/images/spacer.gif

Click to Enlarge

http://www.flash-game-design.com/assets/Basic-flash-site/18.gif


Step 12.

Create a final rectangle on a new layer above, using the color #394448 and the settings shown below.

http://www.flash-game-design.com/images/spacer.gif

http://www.flash-game-design.com/assets/Basic-flash-site/19.gif


Step 13.

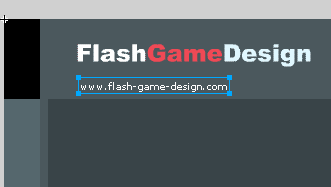
For the logo I used Arial Black and Verdana.

http://www.flash-game-design.com/images/spacer.gif

http://www.flash-game-design.com/assets/Basic-flash-site/22.gif


Step 14.

Next, save the image below and import it on to the stage (file > Import > Import to stage).

http://www.flash-game-design.com/images/spacer.gif

http://www.flash-game-design.com/assets/Basic-flash-site/bar.jpg


Step 15.

Place the image just under the logo and that's the background of the website finshed.

http://www.flash-game-design.com/images/spacer.gif

Click to Enlarge

http://www.flash-game-design.com/assets/Basic-flash-site/23.gif


Step 16.

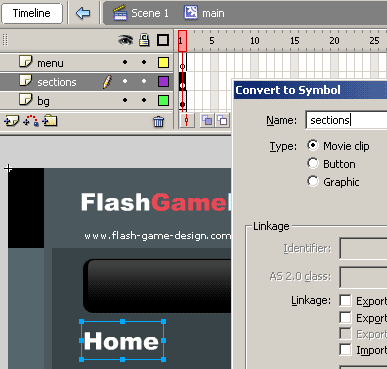
Next, we're going to create the content sections, so go back to the "main" Movie Clip. Create some "Home" text using these settings, on the layer "sections", and convert the text into a Movie Clip symbol called "sections".

http://www.flash-game-design.com/assets/Basic-flash-site/25-large.gif

http://www.flash-game-design.com/images/spacer.gif

http://www.flash-game-design.com/assets/Basic-flash-site/25.gif


Step 17.

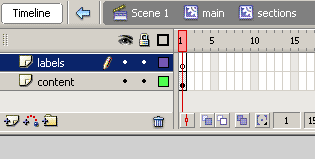
Double click on the text to go into the "sections" Movie Clip. Create a 2nd layer naming it "labels" and the first one "content".

http://www.flash-game-design.com/images/spacer.gif

http://www.flash-game-design.com/assets/Basic-flash-site/28.gif


Step 18.

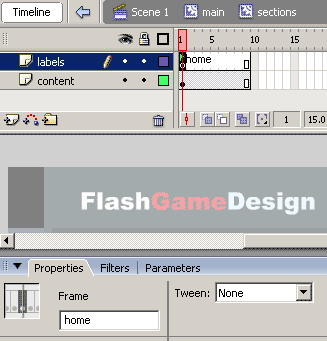
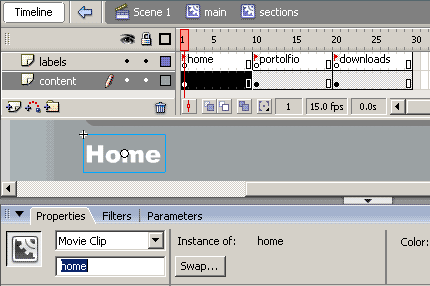
Insert 8 more frames on each layer. Click on frame 1 of the labels layer and then enter "home" in the properties tab, under "frame". This is label we will use later on with Actionscript, to tell the timeline to go to each section, when we want to display it.

http://www.flash-game-design.com/images/spacer.gif

http://www.flash-game-design.com/assets/Basic-flash-site/29.gif


Step 19.

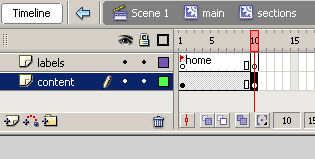
Make a key frame at frame 10 of each layer.

http://www.flash-game-design.com/images/spacer.gif

http://www.flash-game-design.com/assets/Basic-flash-site/30.gif


Step 20.

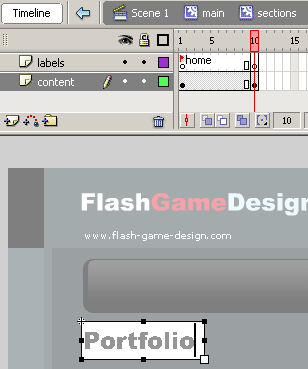
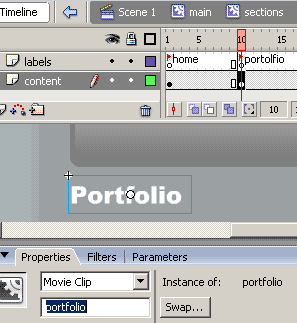
While the timeline is still at frame 10, change the text on teh stage to "Portfolio". If you go back to frame 1 the text there should still be "Home".

http://www.flash-game-design.com/images/spacer.gif

http://www.flash-game-design.com/assets/Basic-flash-site/31.gif


Step 21.

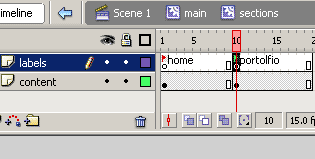
Create some more frames  (up to frame 19 on each layer), and create a label at frame 10, called "portfolio".

http://www.flash-game-design.com/images/spacer.gif

http://www.flash-game-design.com/assets/Basic-flash-site/33.gif


Step 22.

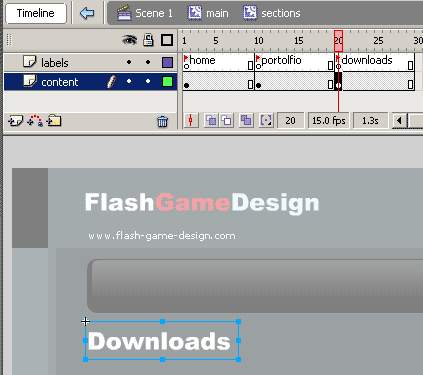
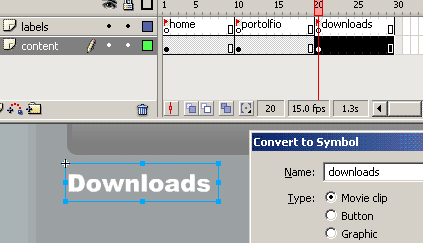
Do the same thing for a downloads section.

http://www.flash-game-design.com/images/spacer.gif

http://www.flash-game-design.com/assets/Basic-flash-site/34.gif


Step 23.

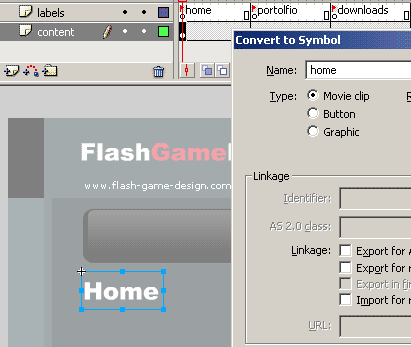
Next, go back to frame 1 and selection the "Home" text. Convert it to a Movie Clip symbol called" "home".

http://www.flash-game-design.com/images/spacer.gif

http://www.flash-game-design.com/assets/Basic-flash-site/35.gif


Step 24.

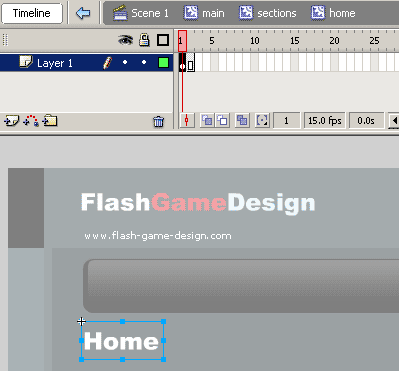
Next we're going to add the rest of the content in the home section, in a way so that it appears bit by bit. So, double click on the "home" Movie Clip symbol and create an extra frame.

http://www.flash-game-design.com/images/spacer.gif

http://www.flash-game-design.com/assets/Basic-flash-site/36.gif


Step 25.

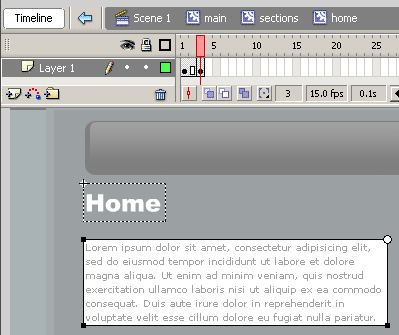
Create a key frame at frame 3 and then add some text. Make sure that the text is at X & Y position using a whole number (ie not 5.4). If it's not at a whole number, the text will appear blurred.

http://www.flash-game-design.com/images/spacer.gif

http://www.flash-game-design.com/assets/Basic-flash-site/37.gif


Step 26.

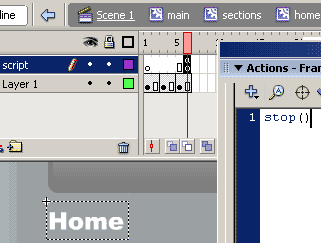
Create another frame for that bit of text. Then create another key frame and add a section paragraph of text. So every 2 frame a bit of the content will appear. ONce all the content is displayed (frame 6), we want it to stop. So, create a black key frame (f7) at frame 6 of the "script" layer and then add a stop() action in the actions panel.

http://www.flash-game-design.com/images/spacer.gif

http://www.flash-game-design.com/assets/Basic-flash-site/39.gif

Step 27.

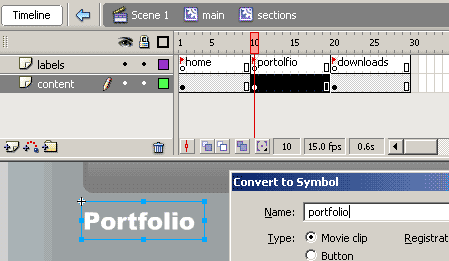
Now, go back to the sections Movie Clip, and convert the "Portfolio" text into a Movie Clip symbol, called "portfolio".

http://www.flash-game-design.com/images/spacer.gif

http://www.flash-game-design.com/assets/Basic-flash-site/40.gif


Step 28.

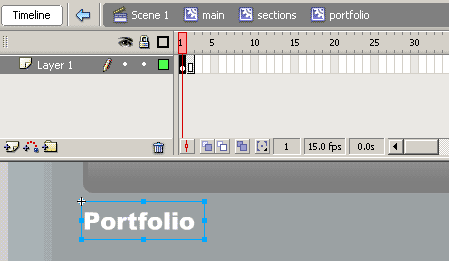
Double click on the text to access the "portfolio" Movie Clip Symbol. As we did for the "home" section, extend create an extra frame.

http://www.flash-game-design.com/images/spacer.gif

http://www.flash-game-design.com/assets/Basic-flash-site/41.gif


Step 29.

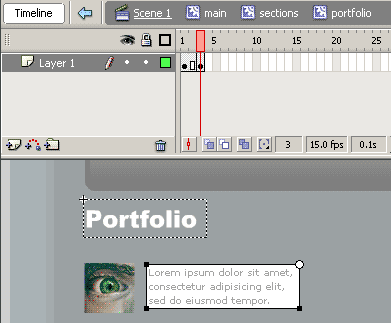
Create a key frame, and then add a thumbnail and some text.

http://www.flash-game-design.com/images/spacer.gif

http://www.flash-game-design.com/assets/Basic-flash-site/42.gif


Step 30.

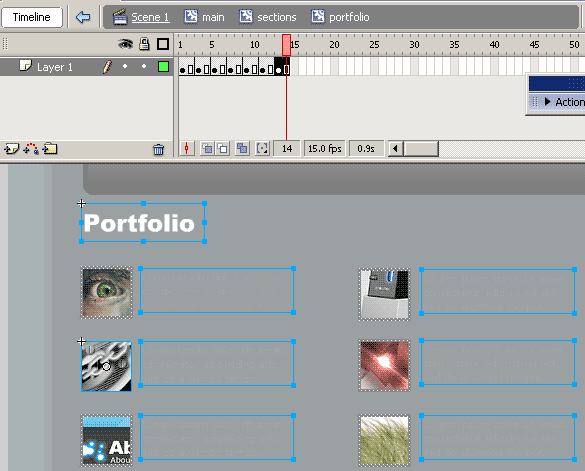
For every 2 frames, add a new thumbnail and a bit of text. For the tutorial I've added 6 thumbnails plus the Heading text, so there are 7 sets of 2 frames.

http://www.flash-game-design.com/images/spacer.gif

http://www.flash-game-design.com/assets/Basic-flash-site/44.gif


Step 31.

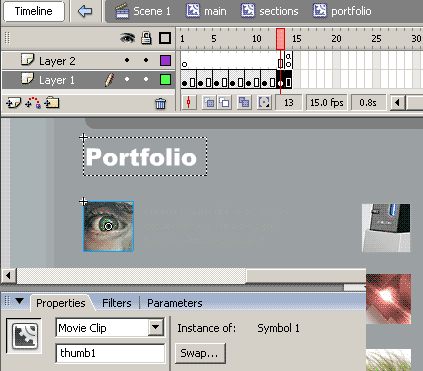
Next, at frame 13 & 14, where all the thumbnails are showing, select each one and give them an instance name, in the properties panel. For the 1st thumbnail I've given it the instance name thumb1.

http://www.flash-game-design.com/images/spacer.gif

http://www.flash-game-design.com/assets/Basic-flash-site/45b.gif


Step 32.

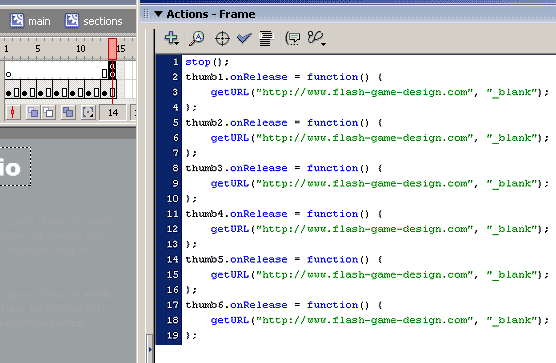
After giving each thumbnail an instance name, add this code on the last frame on a layer above. This code make each thumbnail Movie Clip symbol act like button, and will open up a browser window, going to the address stated in the getURL() statement. You can adjust your thumbnails to open up what ever web page you like.

http://www.flash-game-design.com/images/spacer.gif

http://www.flash-game-design.com/assets/Basic-flash-site/45c.gif


Step 33.

I've create a 3rd section called "downloads, which you can add whatever you like into, with the techniques that have been shown.

http://www.flash-game-design.com/images/spacer.gif

http://www.flash-game-design.com/assets/Basic-flash-site/46.gif


Step 34.

Next, go back to the "sections" Movie Clip, select the "home" Movie Clip Symbol and give it the instance name "home".

http://www.flash-game-design.com/images/spacer.gif

http://www.flash-game-design.com/assets/Basic-flash-site/47.gif


Step 35.

Do the same with the other 2 sections, giving them the instance names "portfolio" and "downloads".

http://www.flash-game-design.com/images/spacer.gif

http://www.flash-game-design.com/assets/Basic-flash-site/48.gif

http://www.flash-game-design.com/images/spacer.gif

Step 36.

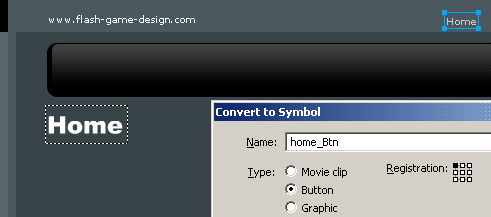
 Next, go back to the "main" Movie Clip symbol and create some "home" text on the "menu" layer, using these settings. Convert the text into a Button symbol called "home_Btn".

http://www.flash-game-design.com/assets/Basic-flash-site/49b.gif

http://www.flash-game-design.com/images/spacer.gif

http://www.flash-game-design.com/assets/Basic-flash-site/49.gif


Step 37.

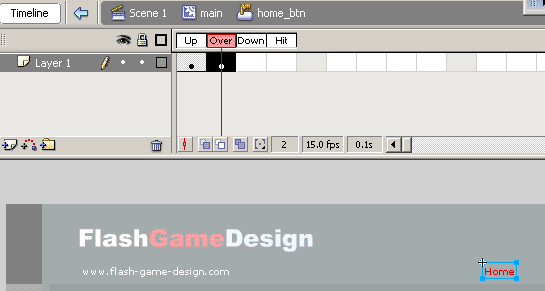
Double click on the "home_btn" Button symbol and create a 2nd key frame (f6). This will be for when the user puts the mouse over the button, so change the color of the text to red.

http://www.flash-game-design.com/images/spacer.gif

http://www.flash-game-design.com/assets/Basic-flash-site/50.gif


Step 38.

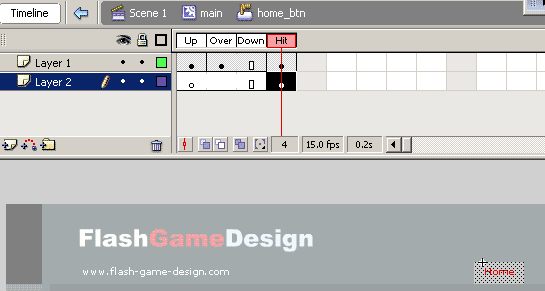
Create another key frame on the hit frame, create a 2nd layer and drag it below the 1st layer. It will be difficult to click the text because it is so small, so we need to create an invisible rectangle below it. Create a blank key frame (f7) on the "hit" state of the 2nd layer and then create rectangle. With a rectangle on the "hit" state, it will be invisible, but the user will still be able to click it.

http://www.flash-game-design.com/images/spacer.gif

http://www.flash-game-design.com/assets/Basic-flash-site/51.gif


Step 39.

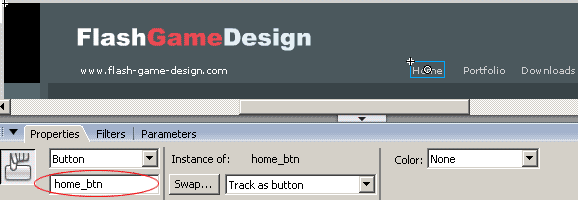
Create 2 more buttons, but with the text "Portfolio" and "Downloads". Then give each button an instance name, with the home one being "home_btn", portfolio "portfolio_btn" and downloads "download_btn".

http://www.flash-game-design.com/images/spacer.gif

http://www.flash-game-design.com/assets/Basic-flash-site/53.gif


Step 40.

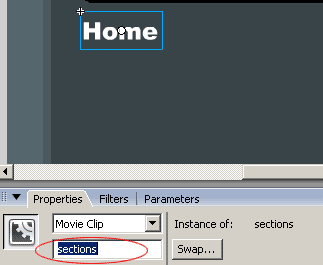
Give the Move Clip symbol on the sections layer the instance name "sections".

http://www.flash-game-design.com/images/spacer.gif

http://www.flash-game-design.com/assets/Basic-flash-site/54.gif


Step 41.

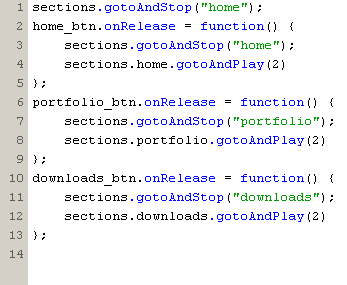
Finally, add this code onto the 1st frame on the "script" layer. This code will tell the sections Movie Clip to go to the "home" label, when the website first appears. When each button is pressed the section with go to the corresponding label.

http://www.flash-game-design.com/images/spacer.gif


http://www.flash-game-design.com/assets/Basic-flash-site/55.gif


http://www.flash-game-design.com/assets/Basic-flash-site/56.gif


Step 42.

http://www.flash-game-design.com/assets/Basic-flash-site/1.gif


Click here to see the finished product.